
Weave It Together

Create a woven artwork with scrap fabric inspired by Anni Albers.
We want to see your creations! Share on social media @hirshhorn with #HirshhornInsideOut.
Time: 45-60 minutes
Skill Level: Advanced
Topic: Structures
LOOK CLOSELY

Anni Albers, Under Way, 1963. Hirshhorn Museum and Sculpture Garden, Smithsonian Institution, Washington, DC. The Joseph H. Hirshhorn Bequest, 1981
Talk together. What do you see? Let your eye wander around the artwork. Describe colors, lines, and patterns.

Detail of Anni Albers, Under Way, 1963. Hirshhorn Museum and Sculpture Garden, Smithsonian Institution, Washington, DC. The Joseph H. Hirshhorn Bequest, 1981
Get a closer look. Look at this detail image. How do you think the artist made this artwork? Describe details you notice that help reveal how it was made.
This artwork is called Under Way. Artist Anni Albers made it by weaving yarn together on a loom. Have you ever seen a loom before? Look up a picture of a floor loom. How do you think it works? Watch this video to find out!
Anni Albers (1899–1994) was an American artist and craftsperson. Born in Germany, she loved art from a very young age. She studied painting as a teenager and decided to attend the famous German art school the Bauhaus, and she established herself as an authority on weaving. Many people at that time viewed weaving as a craft—not a fine art form like painting or sculpture—but Albers was determined to change their minds! She pioneered geometric fabric designs and elevated her weaving to fine art. After completing her degree, Albers and her husband—fellow artist Josef Albers—left Germany in 1933 to teach art at Black Mountain College in North Carolina. Albers experimented with weaving complex geometric patterns, developed Modernist weaving theory, and wrote the book On Weaving, which helped establish design as a field of study. She was the first design artist to have a solo exhibition at the Museum of Modern Art in New York.
MAKE IT!
In this project, you’ll explore creating texture and patterns with woven materials. Create your own experimental woven artwork using a loom.
What is weaving? Weaving is the act of making a piece of cloth. Weavers typically operate alternating materials in two directions, creating the warp and the weft of a woven fabric. The warp yarns run vertically, or up and down, on the loom. The weft is the material that moves horizontally, back and forth across the warp, moving over and under it to create rhythmic patterns.
Anni Albers said, “We sat there and simply tried things out.” Artists at the Bauhaus school experimented and worked together. Make a woven artwork on your own, or do your experiment with a friend!
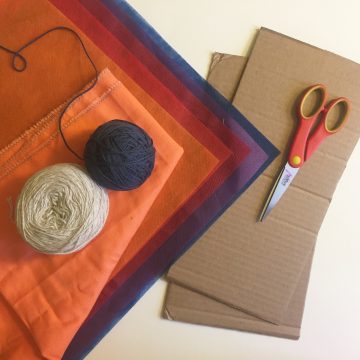
Step 1: Gather materials.
- You’ll need a loom. If you don’t have one, make your own cardboard loom.
- You’ll also need scissors, yarn, and scrap fabric or old clothes for weaving.
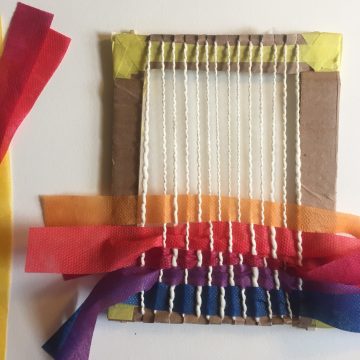
Step 2: Create the warp.
- Make a double knot near one end of your yarn.
- Tuck the yarn into the top right notch on the loom, on the back side. Then guide the yarn to the bottom of the loom, and slide it into the slit on the other side of the loom below where you started.
- Hook the yarn around the back of the loom to the next slit.

Step 3: Prepare fabric strips.
Cut strips of fabrics in varying widths to serve as the weft. They should be long enough to go horizontally across the loom.

Step 4: You’re ready to weave!
Weaving is all about patterns. The pattern featured here is “over, under.” Once you master this pattern, explore the possibilities by making your own pattern variation.
- Select a strip of fabric to be your first weft.
- Start by placing the fabric, your weft, over the first string, then under the next, then over again. Continue the over, under pattern all the way across the loom to make your first row.
- Select another strip of fabric for your second row. This time, you’ll do the same actions in the opposite order: Place your fabric strip under the first string. Pull it over the second string, then under, then over again. Keep following the under, over pattern all the way across the loom.
- Repeat the pattern for the entire length of the loom.
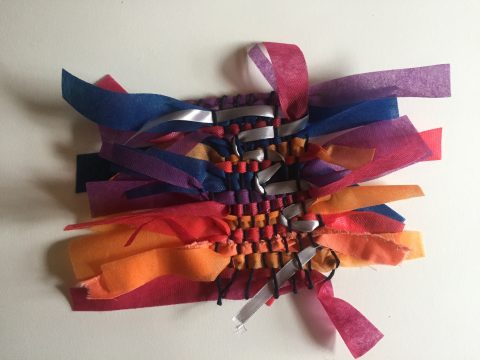
In Under Way, Albers added red and white fibers that wander back and forth across the artwork. Find a ribbon, yarn, or other material and use your fingers to add it to the surface of your weaving. We used a silver ribbon on our artwork.
Step 5: Finish it!
1. Remove the weaving from the loom.
2. Tie the two loose ends of the string together (one with the knot and the other at the end).
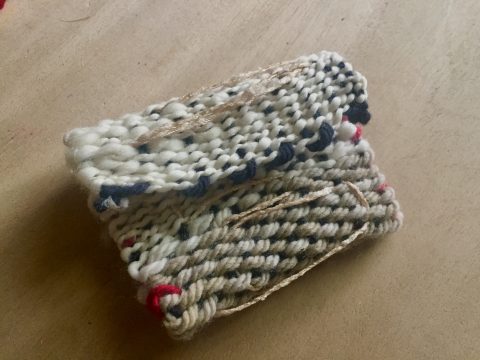
Want to do more with your weaving? Turn it into a pouch you can use!
- You’ll need scissors, a long piece of yarn, and a large needle.

- Thread your needle and fold your weaving to the size you want your pouch pocket to be. You might want to leave some extra fabric at the top to create a flap for the pouch.

- Tie the end of your string to the inside of the weaving, where it will crease when folded to the size you want it to be.

- Fold your weaving to the size you selected, and begin to sew from the bottom to the top. Carry your string across the top of the folded part of the weaving and then stitch down the other side.

- Finish your pouch! When you reach the bottom, tie a knot and cut your string. Get creative and decorate! Look around your house for odds and ends like buttons or pipe cleaners to use as a finishing touch.
We want to see your creations! Share on social media @hirshhorn with #HirshhornInsideOut.